Pressure-Sensitive Adhesive Application Instructions
STEP 1: REMOVE CURL
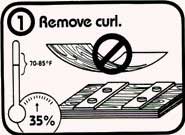
Remove curl from veneer sheets. Lat sheets flat and cover with plywood while sheets acclimatize to the ambient conditions of the job site. Ideal conditions are 70º – 80º F at 35% – 50% relative humidity; prior, during and after installation. If you pre-finish sheets as 2’ x 8’ , they should be dried, re-rolled just as received, and placed back in the original shipping carton. This will help pre-finished sheets stay flat until used on the job. Unsupported, un-mounted pre-finished sheets are subject to finish cracking under adverse conditions of humidity and temperature.
STEP 2: TEST ALL SURFACES

Pressure sensitive adhesive sticks best to lacquered, enameled, or varnished top-coated surfaces which are not peeling, cracking, or flaking and are free of dirt, dust, grime wax or grease. This product normally comes 24” wide. Do not attempt to join sheets to cover areas wider than 24”.
Never attempt to use this product in direct contact with bare wood, sanding sealers, high pressure laminates, melamine surfaces, or other plastic surfaces.
STEP 3: PREPARE SURFACES
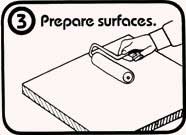
It is the sole responsibility of the installer to test each surface to determine if this product is suitable for each application.
Use only Denatured Ethyl Alcohol (SOLOX) to remove grease, grime, dust and waxes. Never use mineral spirits, naptha, or gasoline. These leave an oily film on the finished surface. Then uniformly scuff sand the finished surface with 280-320 No-Fill sandpaper. (If bare wood is exposed use enamel, lacquer or varnish topcoats to coat the exposed bare wood) Then tack-rag wipe dust free. Re-wipe with denatured ethyl alcohol and apply the sheet.
STEP 4: TRIM TO SIZE
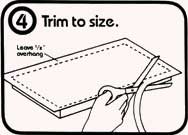
Trim veneer sheet ½” oversize all around to allow trimming. Loose fit the sheet with the release liner in place to ensure correct fit.
STEP 5: PEEL THE RELEASE LINER
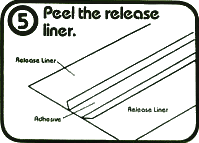
Slit the release liner along the centerline of sheet and peel back 1” on each side to reveal 2” wide strip of adhesive. Crease the liner flat.
STEP 6: ATTACH VENEER
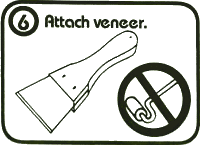
Do not use J roller.
Sheets must be scraped down tightly with a Flexwood® Scraper.
Do not allow adhesive to pick up trash or dust.
Keep fingers off the adhesive.
Do not press tightly to surface until certain that the sheet is in the correct position.
Installed veneers must be promptly finished to guard against high humidity conditions.
STEP 7: ALIGN SHEET
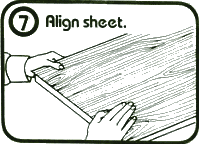
Align the sheet.
STEP 8: LIGHTLY TOUCH DOWN
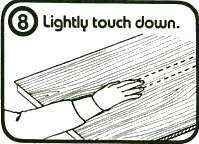
Lightly touch down.
STEP 9: PULL THE RELEASE LINER
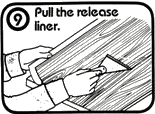
Pull the release liner from the back of the sheet and scrape the veneer to the surface as you pull the liner. Do not use fingers to smooth the veneer. This will result in bubbles. Use the scraper tool. “J” rollers do not result in sufficient nip pressure. Insufficient pressure during application is the major cause of delaminating and checking after application. Pressure sensitive adhesives are very sensitive to lack of pressure. Strive for all possible scraper pressure during application.
STEP 10: THE SCRAPER TOOL MUST BE USED
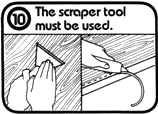
The scraper tool must be used to apply pressure to the sheets. It is very important to eliminate all bubbles and trapped air which will result in a failed application. Go Slowly! It is necessary to exert maximum pressure on the surface with the scraper tool. Use of the release liner or Kraft paper between the scraper tool and the veneer surface will eliminate any burnishing of the veneer.
Re-facing kitchen cabinets
These illustrations show flat panels being covered. If you are installing this product on kitchen cabinet end panels do not jam fit the sheets tightly between the back of the face frame, and the wall. All wood tends to expand in the presence of high humidity. For that reason, never jam Flexwood sheets between limits. Allow at least 1/16” on each side for expansion. Failure to allow for expansion can result in failed applications.
Pressure sensitive adhesive do not achieve ultimate adhesion until 72 hours after being applied to appropriate surfaces. Bear in mind that wood veneers are vulnerable to high humidity. Advise the homeowner of this. Remember every installation requires professional diligence and execution. Birds Eye Maple, Cherry, Maple, and Birch species are unforgiving of any inattention to detail.
In every case we urge and recommend that purchasers before using any product in full scale production make their own tests to determine to their own satisfaction whether the product is of acceptable quality and is suitable for their particular purposes under their own operating conditions. The products herein are sold without any warranty as to their merchantability or fitness for a particular purpose or any other warranty, express or implied. No representative of ours has any authority to waive or change the foregoing provisions but, subject to such provisions, our engineers are available to assist purchasers in adapting our products to their needs and to the circumstances prevailing in their business.